

DevOps: Code Version Control and Build

Tasks for this Blog
- Create repository with version control using AWS CodeCommit
- Build code on the cloud using AWS CodeBuild service.
AWS Cloud9 is a cloud-based integrated development environment (IDE) that lets write, run, and debug the code with just a browser. It includes a code editor, debugger, and terminal. Cloud9 comes pre-packaged with essential tools for popular programming languages and the AWS Command Line Interface (CLI) pre-installed; we don’t need to install files or configure the laptop for this workshop. The Cloud9 environment will have access to the same AWS resources as the user with which is logged into the AWS Management Console.
Setting up Cloud9
- Go to the AWS Management Console > “Services” > Developer Tools > “Cloud9”
- Next, “Create environment”
- Enter “AspirenxtRepo” into Name and optionally provide a Description.
- Click Next
- We can leave the Environment settings at their defaults of launching a new t2.micro EC2 instance which will be paused after 30 minutes of inactivity.
- Click Next
- Review the environment settings and click Create environment. It will take several minutes for the environment to be provisioned and prepared.
Once ready, the IDE will open to a welcome screen. Below that, we should see a terminal prompt similar to:
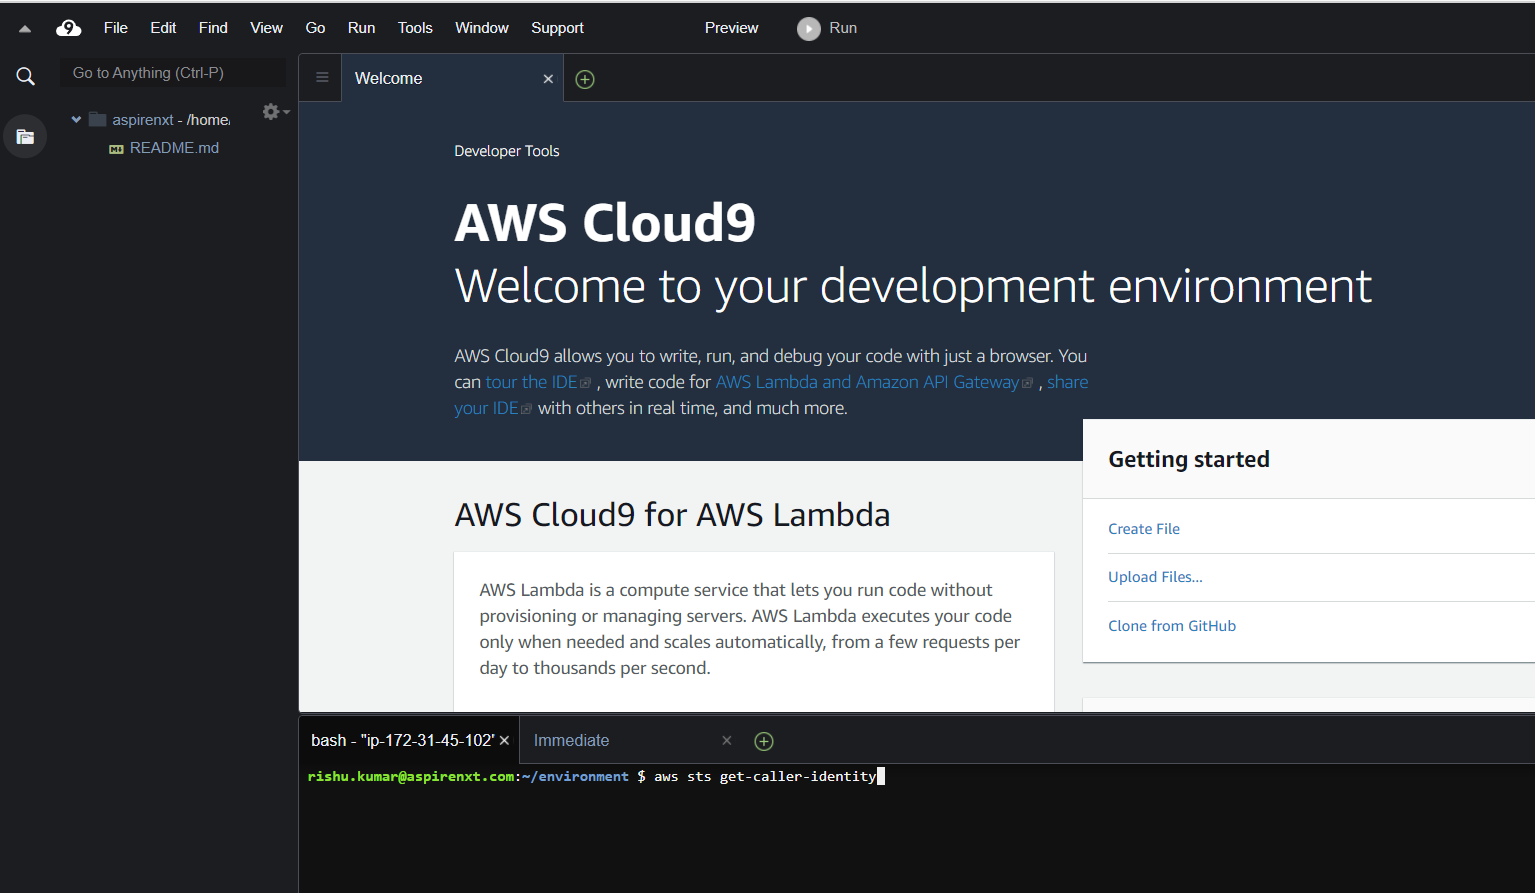
We can run AWS CLI commands in here just like you would on your local computer. Verify that your user is logged in by running the following command.
user:~/environment $ aws sts get-caller-identity
We’ll see output indicating your account and user information:
{ “Account”: “xxxxxxxxxxxx”, “Arn”: “arn:aws:iam:: xxxxxxxxxxxx:user/user”}
Keep your AWS Cloud9 IDE opened in a tab throughout this workshop as we’ll use it for activities like cloning, pushing changes to repository and using the AWS CLI.
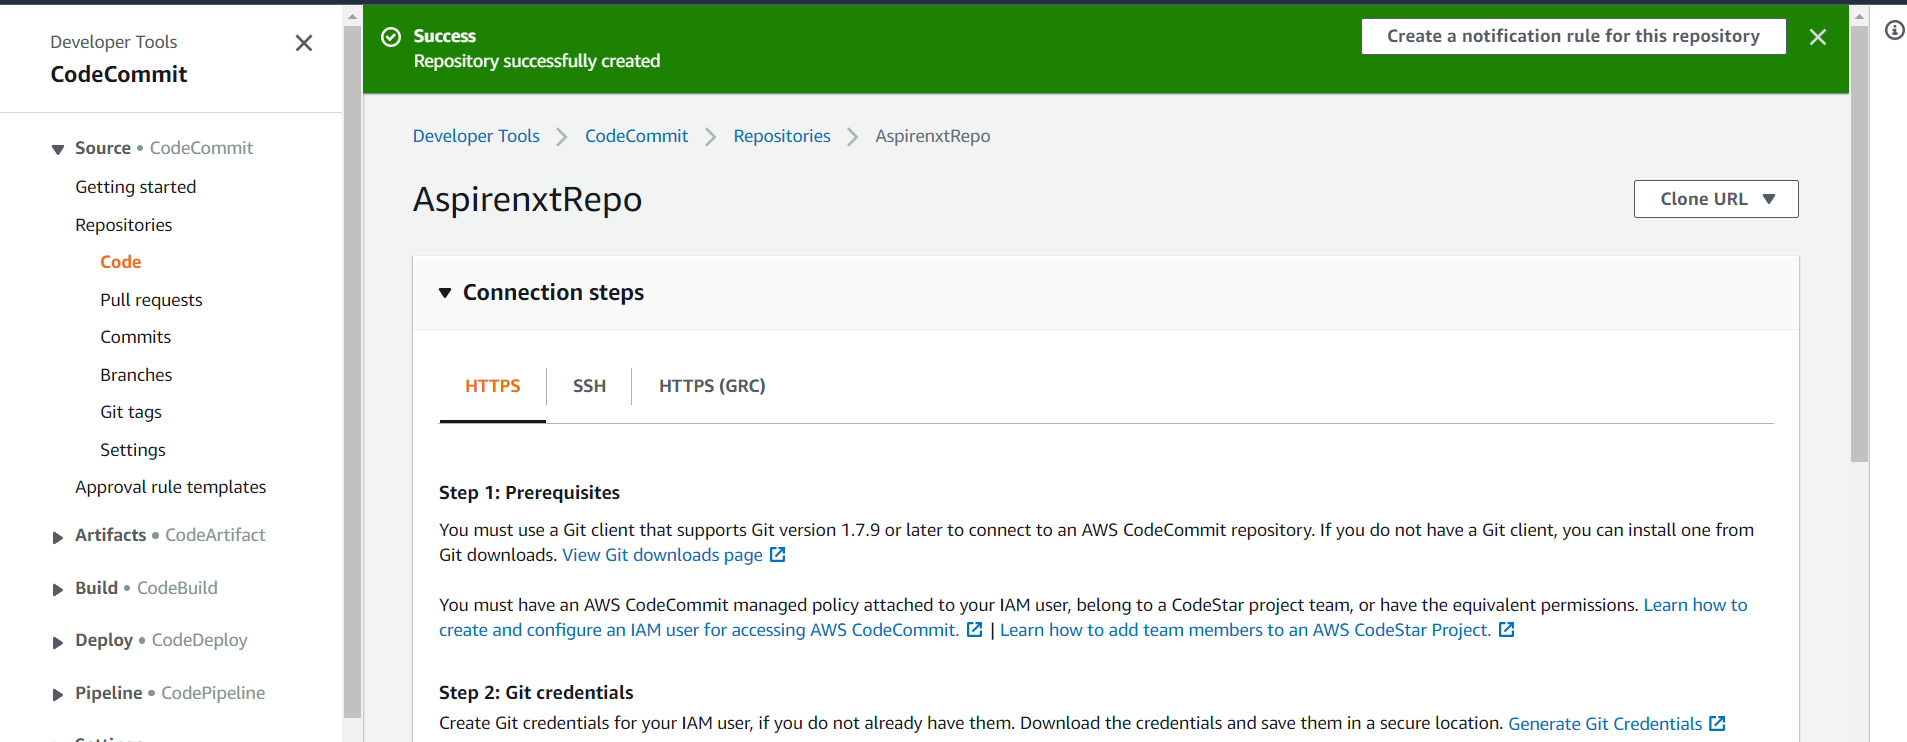
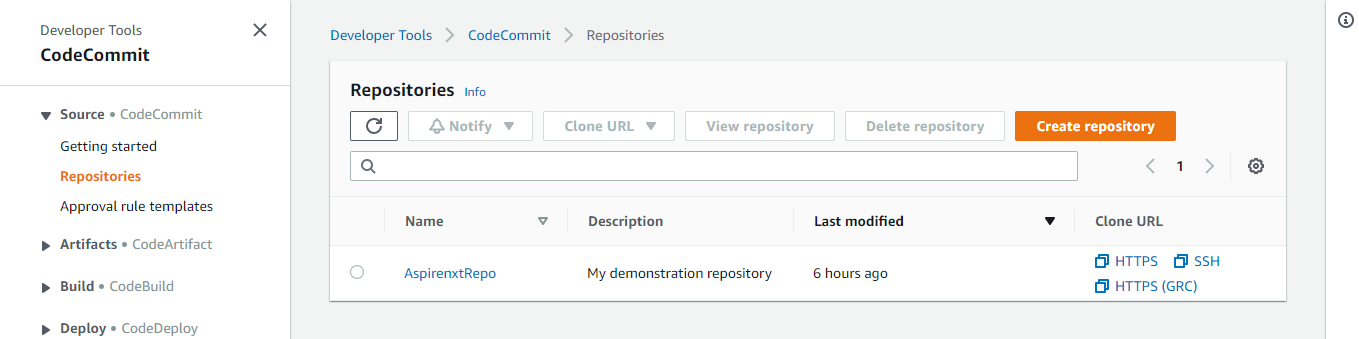
Create an AWS CodeCommit Repository
To create the AWS CodeCommit repository (console)
- Open the AWS CodeCommit console.
- Choose “Get Started Now”. (If a Dashboardpage appears instead, choose Create repository.)
- On the Create repositorypage, in the Repository name box, type AspirenxtRepo.
In the Description box, type My demonstration repository.
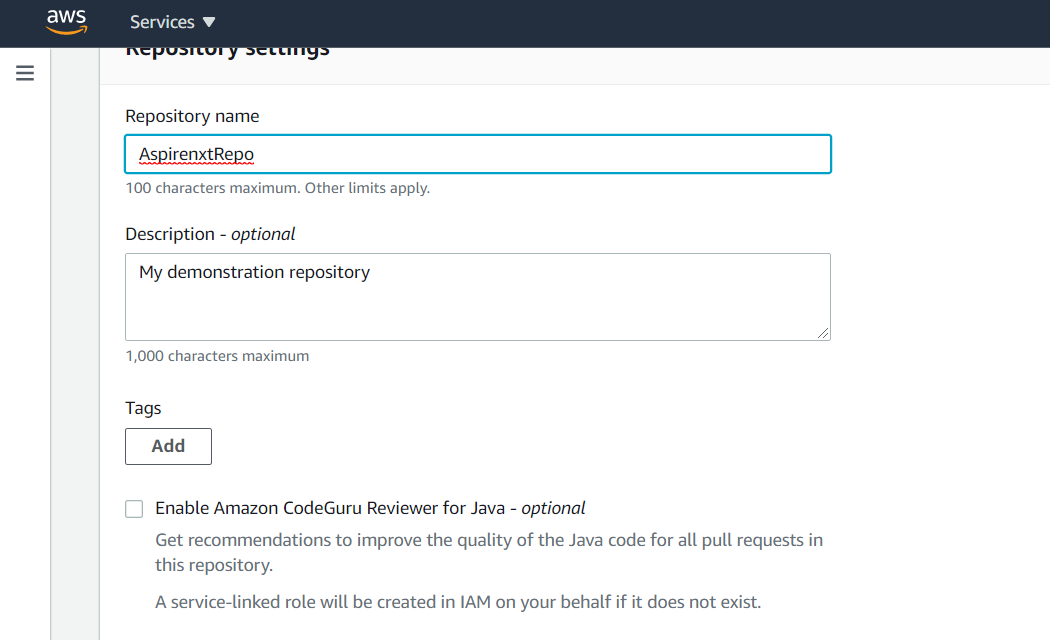
- Choose Create repository to create an empty AWS CodeCommit repository named
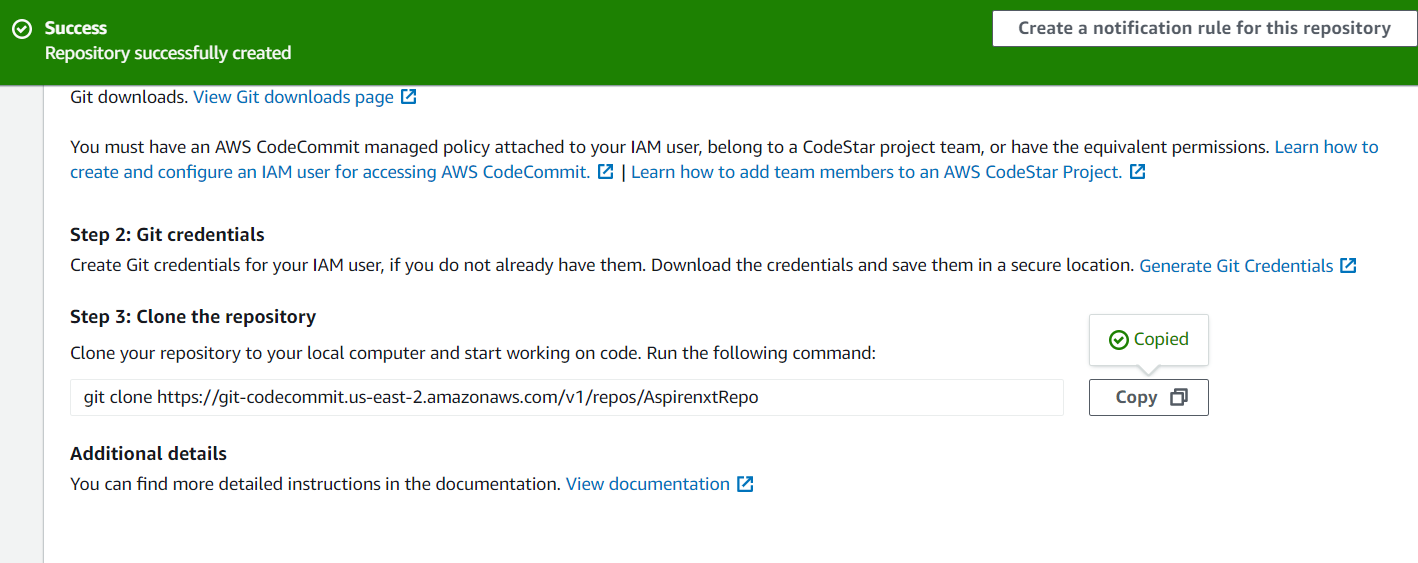
Clone the Repo
In this phase, we will connect to the source repository created in the previous step. Here, we use Git to clone and initialize a copy of your empty AWS CodeCommit repository. Then, we specify the username and email address used to annotate your commits.
- From CodeCommit Console, you can get the https clone url link for your repo.
-
- Next, Go to Cloud9 IDE terminal prompt
- Run git clone to pull down a copy of the repository into the local repo:
user:~/environment $ git clone https://git-codecommit.<YOUR-REGION>.amazonaws.com/v1/repos/AspirenxtRepo
Provide your Git HTTPs credential when prompted. You would be seeing the following message if cloning is successful. warning: You appear to have cloned an empty repository.
Commit changes to Remote Repo
- Download the Sample Web App Archive from AWS Labs Devops Workshop by running the following command from IDE terminal.
-
user:~/environment $ wget https://s3.amazonaws.com/devops-workshop-0526-2051/v1/Web-App-Archive.zip
-
- Unarchive and copy all the contents of the unarchived folder to your local repo folder
-
user:~/environment $ unzip Web-App-Archive.zip
user:~/environment $ mv -v Web-App-Archive/* AspirenxtRepo
-
After moving the files, your local repo should like the one below.

- Change the directory to your local repo folder. Run git add to stage the change:
-
- user:~/environment $ cd AspireRepo
- user:~/environment/AspireRepo/ $ git add *
-
- Run git commit to commit the change:
- user:~/environment/AspireRepo/ $ git commit -m “Initial Commit”
- Run git config credential to store the credential
- user:~/environment/AspireRepo/ $ git config credential.helper store
- Run git push to push your commit through the default remote name Git uses for your AWS CodeCommit repository (origin), from the default branch in your local repo (master)
- user:~/environment/AspireRepo/ $ git push -u origin master
Prepare Build Service
- First, let us create the necessary roles required to finish labs. Run the CloudFormation stack to create service roles. Ensure you are launching it in the same region as your AWS CodeCommit repo.
- user:~/environment/AspireRepo (master) $ aws cloudformation create-stack –stack-name DevopsWorkshop-roles \–template-body https://s3.amazonaws.com/devops-workshop-0526-2051/v1/01-aws-devops-workshop-roles.template \–capabilities CAPABILITY_IAM
- Upon completion take a note on the service roles created. Check describe-stacks to find the output of the stack.
- For Console, refer to the CloudFormation Outputs tab to see output. A S3 Bucket is also created. Make a note of this bucket. This will be used to store the output from CodeBuild in the next step. Sample Output:

- Run the following commands to get the value of Build Role ARN and S3 bucket from cloudformation template launched earlier
user:~/environment/AspireRepo (master) $ sudo yum -y install jq
user:~/environment/AspireRepo (master) $ echo YOUR-BuildRole-ARN: $(aws cloudformation describe-stacks anavar for sale --stack-name DevopsWorkshop-roles | jq -r '.Stacks[0].Outputs[]|select(.OutputKey=="CodeBuildRoleArn")|.OutputValue')
user:~/environment/AspireRepo (master) $ echo YOUR-S3-OUTPUT-BUCKET-NAME: $(aws cloudformation describe-stacks --stack-name DevopsWorkshop-roles | jq -r '.Stacks[0].Outputs[]|select(.OutputKey=="S3BucketName")|.OutputValue')
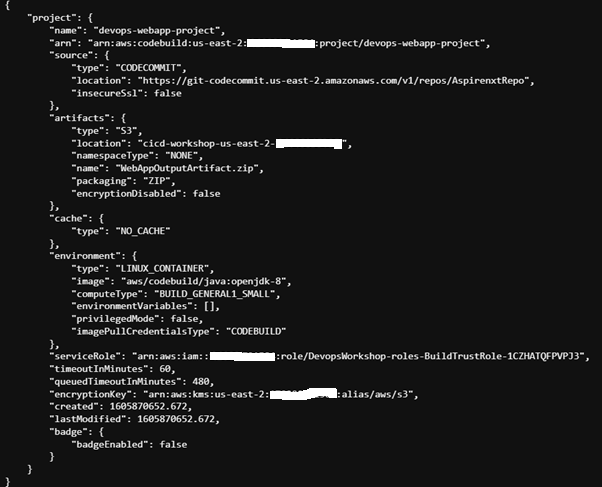
- Let us create CodeBuild project from CLI. To create the build project using AWS CLI, we need JSON-formatted input. Create a json file named ‘create-project.json’ under ‘MyDevEnvironment’
Copy the content below to create-project.json. (Replace the placeholders marked with <<>> with values for BuildRole ARN, S3 Output Bucket and region from the previous step.)
{
“name”: “devops-webapp-project”,
“source”: {
“type”: “CODECOMMIT”,
“location”: “https://git-codecommit.<<REPLACE-YOUR-REGION-ID>>.amazonaws.com/v1/repos/AspireRepo”
},
“artifacts”: {
“type”: “S3”,
“location”: “<<REPLACE-YOUR-S3-OUTPUT-BUCKET-NAME>>”,
“packaging”: “ZIP”,
“name”: “WebAppOutputArtifact.zip” },
“environment”: {
“type”: “LINUX_CONTAINER”,
“image”: “aws/codebuild/java:openjdk-8”,
“computeType”: “BUILD_GENERAL1_SMALL”
},
“serviceRole”: “<<REPLACE-YOUR-BuildRole-ARN>>”
}
- Switch to the directory that contains the file you just saved, and run the create-project command
user:~/environment $ aws codebuild create-project --cli-input-json file://create-project.json
- Sample output JSON for your reference
{ “project”: {
“name”: “project-name”,
“description”: “description”,
“serviceRole”: “serviceRole”,
“tags”: [
{
“key”: “tags-key”,
“value”: “tags-value”
}
],
“artifacts”: {
“namespaceType”: “namespaceType”,
“packaging”: “packaging”,
“path”: “path”,
“type”: “artifacts-type”,
“location”: “artifacts-location”,
“name”: “artifacts-name”
},
“lastModified”: lastModified,
“timeoutInMinutes”: timeoutInMinutes,
“created”: created,
“environment”: {
“computeType”: “computeType”,
“image”: “image”,
“type”: “environment-type”,
“environmentVariables”: [
{
“name”: “environmentVariable-name”,
“value”: “environmentVariable-value”,
“type”: “environmentVariable-type”
}
]
},
“source”: {
“type”: “source-type”,
“location”: “source-location”,
“buildspec”: “buildspec”,
“auth”: {
“type”: “auth-type”,
“resource”: “resource”
}
},
“encryptionKey”: “encryptionKey”,
“arn”: “arn”
}
}
- If successful, output JSON should have values such as:
- The lastModified value represents the time, in Unix time format, when information about the build project was last changed.
- The created value represents the time, in Unix time format, when the build project was created.
- The ARN value represents the ARN of the build project.
Let's build the code on cloud
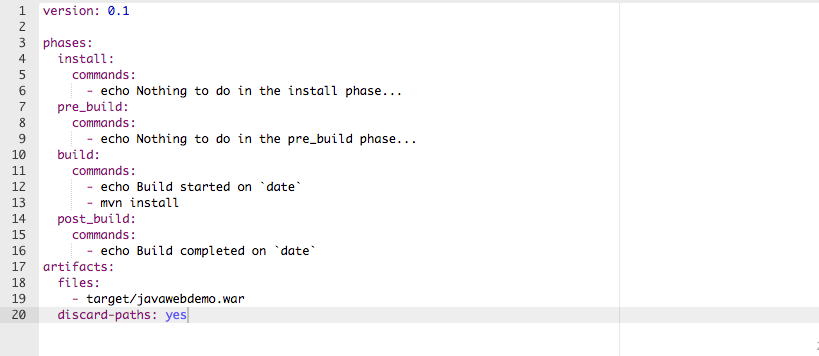
- A build spec is a collection of build commands and related settings in YAML format, that AWS CodeBuild uses to run a build. Create a file namely, buildspec.yml under AspireRepo folder. Copy the content below to the file and save it.
version: 0.1
phases:
install:
commands:
– echo Nothing to do in the install phase…
pre_build:
commands:
– echo Nothing to do in the pre_build phase…
build:
commands:
– echo Build started on `date`
– mvn install post_build:
commands:
– echo Build completed on `date`
artifacts:
files: – target/javawebdemo.war
discard-paths: Yes
A sample is shown below:
- Commit & push the build specification file to repository
user:~/environment/AspireRepo/ $ git add buildspec.yml
user:~/environment/AspireRepo/ $ git commit -m "adding buildspec.yml"
user:~/environment/AspireRepo/ $ git push -u origin master
- Run the start-build command
user:~/environment/AspireRepo (master) $ aws codebuild start-build --project-name devops-webapp-project
- If successful, data would appear showing successful submission. Make a note of the build id value. You will need it in the next step.
- In this step, you will view summarized information about the status of your build
user:~/environment/AspireRepo (master) $ aws codebuild batch-get-builds --ids <<ID>>
Note: Replace <> with the id value that appeared in the output of the previous step.
- You will also be able to view detailed information about your build in CloudWatch Logs.
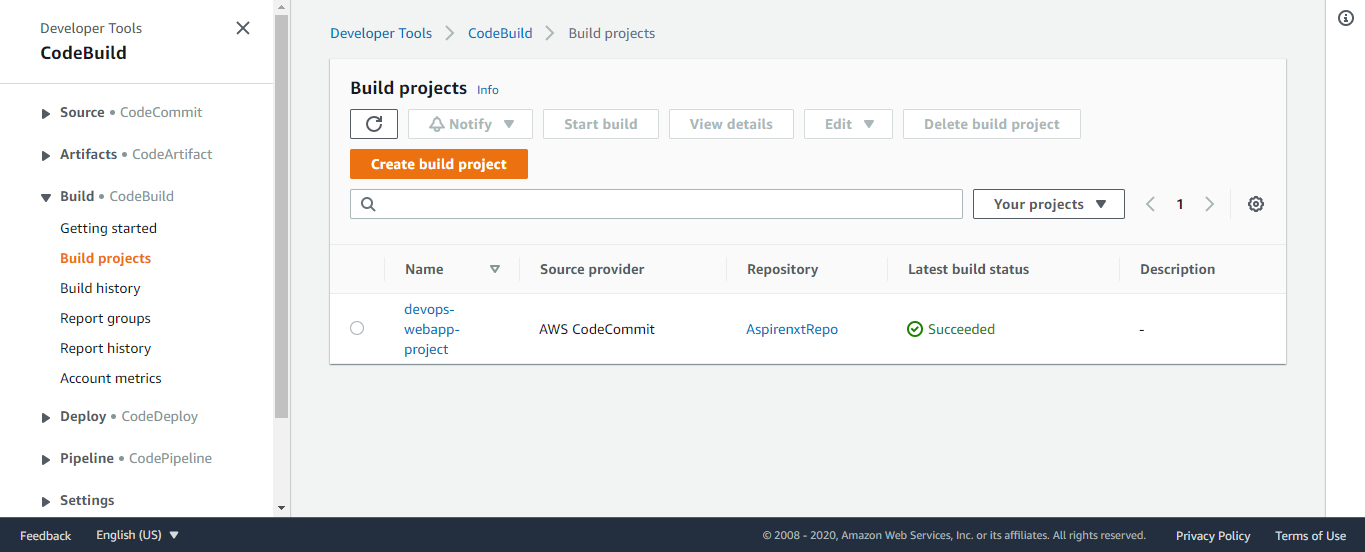
- In this step, you will verify the zipfile that AWS CodeBuild built and then uploaded to the output bucket. You can complete this step by visiting the AWS CodeBuild console or the Amazon S3 console.


